Are you looking forward to doing your T-shirts on a large scale but with better results? Try screen-printing.
The early Chinese started screen-printing when they used hair to make screens for their printing machines. With the changing technology and ease of doing things, the machine has undergone serious transformations to what we see today.
How to do Screen Printing on T-Shirt
For a first time user, using the screen-printing machine can be intimidating but once you get the flow, it becomes very easy to manage and within a short time become a customers’ favorite.
Follow this guide and be the best of what customers are looking for.
What are the Basics of Screen-Printing?
Understanding screen-printing means knowing how the stencil functions. Rather than cutting images one by one, the screen is coated in picture emulsions and the image cut out with the help of a laser or bright light as indicated on the video above.
However, it is crucial that we know what tools and equipment needed to start your home business.
You need to Setup a Silk Shop
Make sure all your supplies are in order by making sure you have the following:
A screen and a frame that can be bought separately at any nearby local arts either store or get a frame and a screen at an affordable price.
- Photo emulsion screen and sensitizer
- A bulb with at least 250-watt bulb
- Gloves
- A dark room or a closet would do
- A T-shirt
- A squeegee
- An ink that can suit a silkscreen
- A small piece of cardboard that fits into the shirt
How to Screen-Print
Creating the Image
If you are doing this for the first time, start with a simple creation with smaller lines. Try using silhouettes as a way to chart your path into the art. What you need is a solid black image whose sole purpose at this stage is to block the light. The selected image should be blunt when presented against the emulsion in later stages.
Once you decide on the image, make a print out on a transparency paper. If you do not feel like buying, transparency papers now and then try the copy shops that charge less than a dollar for every copy.
Use Screen Emulsion for Coating
When applying the emulsion coat, you can come up with a sanitizer and an emulsion. Mixing them as per the bottle’s direction. Lay the screen on your working area. Spread out the emulsion mixture using a squeegee.
The emulsion should by now cover a slightly larger area than the image you want to print. Continue coating spreading or coating the screen until you will not be able to see through it. The coating has to continue if you desire a thin and even layer across the entire screen.
Let the screen dry for at least two hours in a pitch-dark room.
Expose the Image
Lay the transparency bearing the image on the screen where photo emulsion is present. You can choose to lay a piece of glass over it or use a transparency tape known as the scotch tape.
Move the lamp to be at least two feet above from the emulsion screen. The lamp shining at 250 watts should be at an angle before leaving the room. The preferred choice of a lamp is the desk lamp.
If you cannot get a lamp desk, use a reflector out of a tin foil and place it on top of the lamp to reflect the light downwards.
You are not supposed to turn on any other light. Meanwhile, wait for 15 minutes and carefully pull out the transparency. Faint blue lines should take the place of the image on the screen.
If the outcome looks pleasant, clean it off. In some cases, you may notice that the image needs at least a few more minutes to burn on the screen. Overexposure may make the image bleed.
Clean the Screen
Make sure you spray the screen with cold water from either a horse, showerhead, or sink. Please note that the image section and how cold water starts to flake. Keep on spraying you until you see the other side of the image.
Hold the screen up against light to make sure it looks like your transparency and the let the screen dies. Once dry, cover the visible parts of the screen, which is the same areas that are exposed parts of the screen with tape.
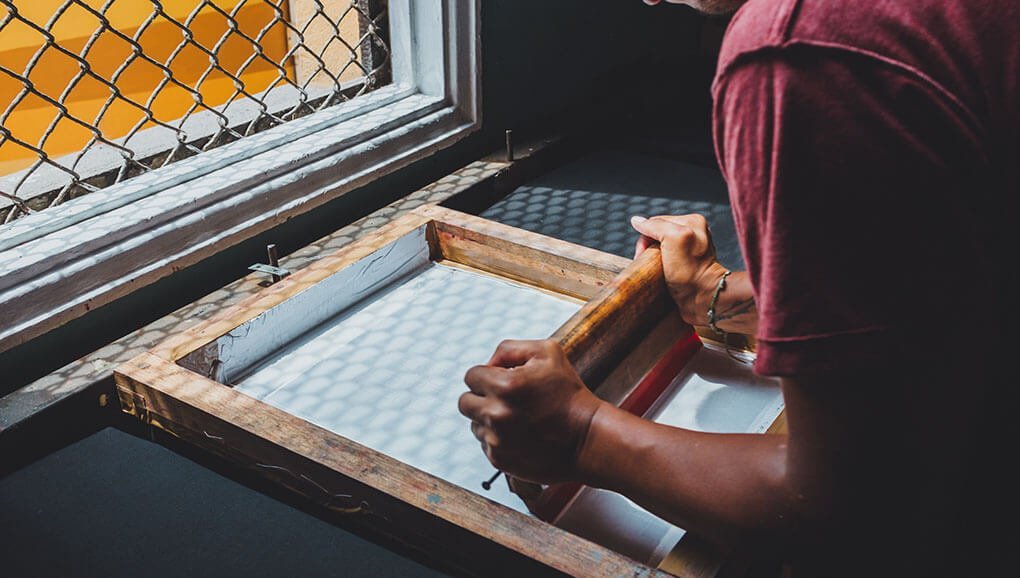
Printing
Lay the shirt on an even surface. Put in a square piece of cardboard underneath the shirt in the area you want to print. Lay the screen with the design to be printed over the shirt. Pour drops of ink in a horizontal fashion across the screen.
Bring in the squeegee and make one smooth motion down the screen applying strong pressure. Lift the screen and cardboard carefully. If you want the design to stick for a long time, get the shirts inside an oven boiling at 400 degrees for about the 30 seconds.
Also read: Heat Transfer vs. Screen Printing – What’s The Difference? & Ancient history of Asian textile printing
Cleaning Up
The rate of drying of quick printing ink is fast and as soon as you are done with printing shirts. Do not forget to wash the screen for future use. You can use an emulsion remover when you want to use a different image. The cleanup gives you an opportunity to re-use both the frame and fabric.
Summarizing
Screen-printing may take longer than you intend to understand how to do it at home. The more practice you get into, the pressure needed to produce better results, and the little creativity is all that counts to your success.
Once you get the flow of things, handling different colors should not be a difficult thing. You can compete with big companies if you decide to learn screen-printing through patience.